Pages

Friday, August 30, 2013

Crunchy Ranch Chicken Tenders


I have made a lot of chicken tenders, trying to find a good recipe that has a lot of flavor and the breading doesn't come off. My little was a allergic to eggs, and (finally!) has grown out of it! So we are now able to give her anything made with eggs! These chicken tenders seemed like a great kid friendly meal that I could feed to her! We had our niece spend the night, and whipped these up, they are so easy to make and every one loved them! This is a must try recipe! 


Ingredients:
2/3 cup corn flake crumbs OR panko bread crumbs
1/2 cup all-purpose flour
2 eggs, slightly beaten
1 (1-ounce) package dry ranch-flavored dressing mix
1 lb. boneless, skinless chicken tenders
3 Land O Lakes Garlic and Herb Saute Express Squares


Directions:
1. Place corn flake crumbs (or panko bread crumbs), flour and eggs into 3 separate shallow bowls. Add ranch dressing mix to the bowl with flour and stir to combine.

2. Coat each chicken tender with flour (shaking off the excess). Then, dip into the beaten egg and press into the corn flake crumbs (or panko bread crumbs).

3. Melt each Saute Express Square in a skillet over medium-low heat. Place the chicken tenders into the skillet, turning occasionally for about 10-12 minutes. 


Enjoy!


Source: landolakes.com

Wednesday, August 28, 2013

Pizza Decorating for Dinner


My little girl had so much fun getting to decorate cookies for her Grandma's birthdays, so we decided to have homemade pizza for dinner! Emma got to decorate her own little pizza!
We started out by making the dough. You can buy pre-made dough or make your own (they are very simple)! We made one for daddy, one for mommy, and one for Emma. Emma's ended up being bigger than we wanted, and she only ate half of it! We baked the dough for a few minutes, so we could bake it on the oven rack instead of on a pan (John swear it tastes better that way).
On the table we layed out wax paper for an easy clean up, each of our pizza's and lots of toppings. We bought a variety of toppings: pepperoni, bacon, mushrooms, spinach, onions and cheese. I gave Emma a little bit of each topping and some sauce with a kitchen brush. 


She did a great job, we just made sure she had enough sauce and cheese.
Emma got hungry during the pizza decorating part and started eating the toppings instead of putting them on her pizza! 


Emma's pizza came out great! 


It definitely got her approval! This is a super fun activity to keep your little one entertained, and get them started in cooking with Mommy.


Girl's Ghost Tutu Halloween Costume


I am tutu obsessed! I am constantly making my little one a tutu to wear! This is such a cute friendly girl ghost costume! 

Wouldn't your little one look adorable in this??

Fall Bucket List Printable


The new Fall Bucket List is here! 


This is a really fun idea for each season! This is a list of Holiday MUST'S. The time can seem to get away from us, and before we know it, it is Winter and Fall is over. Use this list to keep track of all the fun activities you want to do this season (make sure to take lots of pictures each time)! It will make your kids look forward to the upcoming activities even more! Simply print out your bucket list (card stock will make it more durable) and put it in a frame where you can use a dry erase marker to mark off each time you do a Holiday MUST! 

I am SO ready for Fall! This is going to be one exciting fall season for Mommy and Things. I am going to be posting TONS of yummy pumpkin recipes, DIY crafts, decoration ideas, fun ideas for toddler time, pumpkin decorating ideas, cute Halloween costume ideas, crafts to teach kids about being thankful and lots of fun ideas to do with your sweet family this Fall season! Fall is my favorite season! This year my little one year old is learning new words everyday and is so alert, it is going to make for a very fun time!

Make sure you subscribe to my blog to be able to follow along with all the exciting thing that are coming up!


What are you and your family MOST looking forward to this Fall season?

Monday, August 19, 2013

Homemade Gifts for Grandparents


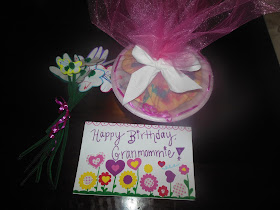
 It was my mom's birthday this past week {Happy Birthday, Mom!}. Of course any gift from the ONLY grandchild, would be her favorite! So Emma and Mommy made some "hand print" flowers, "painted" sugar cookies and a sticker card. These were so easy to make and cost a just under $6.00 (including baking the cookies!) We already had a lot of these items and ingredients for the cookies, so I only bought 4 things! Grandma loved it! When she unwrapped the cookies to see Emma's art work, Emma grabbed one and took a bite! This is a great gift that any grandparent or parent would love to get from their favorite toddler!


To make the card I did a little work on it before Emma decorated it. I colored a top border and wrote "Happy Birthday" on the front, on the inside I wrote "We Love You!", and the back the year and "made by Emma {with help from Mommy}" I bought a package of foam stickers that included hearts and flowers, these are great for her age, because they won't bend or stick together and they come in larger sizes. I got a large pack for $1.88 at Wal-Mart, I figure we will be using a lot of these! Then I gave Emma some crayons and markers and let her color the inside, she tried to do her hand print all by herself!


Emma's finished product! I went back and added a smaller flower or heart in the middle, I gave her the color choices and she picked the one that got used! Then I added some green stems and leaves to make them look like flowers! 

Here is our finished card: 


The "hand print" flowers were so easy to make! It is a simple way to reuse kids scribble in a cute craft! I gave Emma a plain sheet of computer paper and some crayons and markers (the washable kind!). She colored all over the paper, when she was done we did 2 hand prints over the most colored parts. I drew a few flowers, in different sizes, over the rest of the scribble marks that she made. When she took a nap, I cut out the flowers and hand prints. I cut a very small "+" cut in the middle of each hand print or flower. I bought a package of green pipe cleaners or "fuzzy sticks" for $0.88 at Wal-Mart. I took the green stick and threaded it through the "+" cut that I made on each flower or hand print. To make it stay, I curled the top of the stick into a little ball, with the pointy end facing down. I put them all together as a "bouquet of flowers" and tied a ribbon on them! I'm positive my mom will keep these forever! 


I saved the cookies for last. We made a homemade batch of soft heart-shaped sugar cookies. I made a simple powered sugar icing and added a few drops of a neon pink and blue food coloring, then I gave Emma a few of them, the icing with paint brushes and a few sprinkles to put on top. She decorated a few and then picked up one and ate it! It was surprising considering she has never had a cookie before! Smart girl, took a cookie break! Once she was done, we let the icing dry and harden up. I took a paper plate, punched a few holes on the sides, laced a ribbon through and tied it with a bow! A much better presentation than a paper plate, and you don't have to worry about getting your dishes back! I wrapped it in some pink tulle I had, and tied it with a white ribbon! 


 This was taken after Grandma opened it, Emma immediately took a cookie ran off and took a bite. Then she put it back! Silly girl! But don't her cookies look great?


What are some of your favorite handmade gifts from the little one?

The Best Rolled Sugar Cookie and Icing


We love this recipe! It so easy to make and we usually have all the ingredients in the house. This recipe is made for cutting out shapes and decorating. I used this recipe to make a birthday gift to Grandma from my 19 month old, "painted" cookies, check out that post here


Ingredients:

For the cookies:  **This recipe makes about 30 cookies. 
3/4 cup butter, softened
1 cup sugar
2 eggs
1/2 teaspoon vanilla extract
2 1/2 cups all-purpose flour
1 teaspoon baking powder
1/2 teaspoon salt

For the Icing: **If you are using this for "painting cookies, add more milk to make the icing easier for little kids to "paint" their cookies with.
1 cup powdered sugar
1 1/2 tablespoons milk
1 teaspoon of vanilla


Directions:
1. In a large bowl, cream together butter and sugar until smooth. Beat in eggs and vanilla. Stir in flour baking powder and salt. Cover and chill for at least one hour (or overnight). 

2. Preheat oven to 400 degrees. Roll out dough on a floured surface 1/4 to 1/2 inch thick. Cut shapes with any cookie cutter. Place cookies 1 inch apart on ungreased cookie sheet. 

3. Bake 6-8 minutes. Let cool completely before decorating. 


To Make The Icing:
1. Combine all ingredients with fork, until smooth. **To make painting icing, add a tiny bit more milk to make it thinner and easier to "paint" with. 


Source: tablespoon.com, allrecipes.com

Red Velvet Cupcakes with Cream Cheese Frosting


I made these for the first time for Valentine's day 2 years ago. They are amazing! It's a delicious red velvet cake recipe and the frosting is amazing! This is a Paula Deen recipe, and it is always my go to recipe for red velvet cake. I hope you like it as much as I did!


Ingredients:

For the Cake:
2 large eggs, room temperature
1 cup buttermilk, room temperature
1 1/2 cup vegetable oil
1 teaspoon cocoa powder
1 teaspoon salt
1 teapsoon baking soda
1 1/2 cup sugar
2 1/2 cup all-purpose flour
2 tablespoon red food coloring
1 teaspoon white distilled vinegar
1 teaspoon vanilla extract

For the Frosting: 
1 pound cream cheese, softened
2 sticks butter, softened
1 teaspoon vanilla extract
4 cups sifted confectioners' sugar
chopped pecans for garnish


Directions:

1. Preheat the oven to 350 degrees. Line 2 (12 cup) muffin pans with cupcake liners. In a medium mixing bowl, sift together the flour, sugar, baking soda, salt and cocoa powder. 

2. In a large mixing bowl, gently beat together the oil, buttermilk, eggs, food coloring, vinegar and vanilla with a handheld electric mixer. Slowly add the dry ingredients into the wet ingredients and mix until thoroughly combined.

3. Divided the batter evenly among the cupcake liners, filling them about 2/3 of the way full. Bake the cupcakes for 20-22 minutes, making sure to turn the pans once, halfway through. Test the cupcakes with a toothpick to make sure they are done, and let them cool completely before frosting.

For the Frosting:
1. In a large mixing bowl, beat the cream cheese, butter and vanilla together until smooth. Add the powdered sugar in on low speed, until thoroughly mixed. Beat the frosting on high until the cream cheese frosting is light and fluffy.


Enjoy!


Source:  pauladeen.com

Tuesday, August 13, 2013

Nutty Monkey Protein Smoothie


This smoothie is packed full of vitamins and proteins. It makes a healthy alternative for an after school snack, that will keep the kids satisfied until dinner time! In my house we love using smoothies as a healthy dessert.


Ingredients: Makes 2 (2 cup servings)
1 cup plain greek yogurt
1 cup ice
1/2 cup nonfat milk
2 banana's, peeled and chopped
3 tablespoons unsalted peanut butter
3 tablespoons honey


Directions:
Place all the ingredients in a blender and blend until smooth, about 45 seconds. Serve immediately. 


Source: cabotcheese.coop

Pioneer Woman's Chicken Pot Pie


I have tried a lot of chicken pot pies, and I had yet to find the perfect one.. until now. Some were made with biscuits, others lacked flavor and that creamy gravy. But this.. this is THE chicken pot pie recipe. It has delicious soft vegetables, a creamy flavorful broth, and a buttery flaky crust! I will never make another one. It is seriously that good! Now, I have heard a lot about preparing and then freezing meals, but I have never took the dive and tried it, until now. This recipe is actually recommended to make ahead of time and freeze. The first time I made it, I had cream, celery and pie dough left over. Of course, it felt like a waste of money. We loved it so much, that I made it again the next week, using enough ingredients for 2! It was so much easier, the portions are just right for 2 batches and I love that I have nice, delicious chicken pot pie in my freezer waiting for me to feel like having a lazy dinner and not wanting to cook!


Ingredients (for 1 pie):
3 celery stalks
3 medium carrots, peeled
1 large yellow onion
4 tablespoons (1/2 stick) of butter
2 cups cooked shredded chicken breast
1/4 cup all-purpose flour
2 cups low sodium chicken broth or stock
1 chicken bouillon cube
1/2 cup frozen peas
1 cup heavy cream
2 sprigs fresh thyme
1 teaspoon salt
black pepper, for seasoning
pie dough, store bought or homemade (homemade recipe below)


Directions:

1. Begin preheating the oven to 400 degrees and by dicing the celery, carrots, and onion into small, fine dice. 

2. Melt the butter in a dutch oven or large pot over medium heat. Add the celery, carrots, and onion. Saute the vegetables for a few minutes, until translucent. 

3. Add the chicken and stir to combine. Sprinkle the flour evenly over the top and stir to combine. Cook for a few minutes, gently stirring. 

4. Pour in the chicken broth and stir. Add the chicken bouillon cube and stir. The mixture should start to look like a creamy gravy, but still runny. Next, stir the frozen peas in.

5. Pour in the cream and stir. Allow the mixture to cook over low heat, for about 4 minutes, stirring occasionally, so the mixture can thicken. Season with thyme, salt and pepper. Be sure to taste it and make sure it is seasoned good!

6. Pour the mixture into a deep pie pan, or small casserole dish. (If you are freezing one, the foil pie pans work great!

7. Place the crust onto the top of the pan, pressing the edges down (it doesn't need to be prefect) and place a few slits in the crust to make sure the mixture can let out steam. 

8. Bake for about 30 minutes, until the mixture is bubbly and the crust is golden brown. Let the pie cool for 10 minutes before eating (this will help the mixture to thicken some as well). 


Thyme Pastry Dough

Ingredients:
1 1/2 cups all-purpose flour
1/2 teaspoon salt
3/4 cup cold butter (1 1/2 sticks)
1 egg
2 1/2 tablespoons cold water
1/2 tablespoon distilled white vinegar 
1 spring of fresh thyme leaves, thinly diced


Directions:

1. Combine the flour and salt in large bowl. Use a pastry cutter or 2 forks to gradually work the cold butter into the flour until it resembles small pebbles, this should take about 3-4 minutes.

2. Lightly beat the egg with the fork and add it to the mixture. Next, and the old water and vinegar and stir until combined. (This can be made ahead of time and refrigerated at this point)

3. When ready to use the dough, cover a clean surface with a small amount of flour, and in the thyme and knead the dough to mix it in. Then, begin to roll out the dough1 inch larger than the pie pan. 


Comment if you made this and loved it! 


Photo Source: lydias cozy corner
Recipe Source: foodnetwork.com